With Halloween only a few days away I thought I would test out some Pinterest Halloween "recipes" that I found!
First I wanted to try this Graveyard Taco Dip. Taco dip is a staple at any event we host so this seemed like a great way to make it a little spooky.
This one looked relatively easy so I was excited to give it a try. First step is to make your favourite dip. I have a favourite taco dip that I love making but the only thing I did differently was to put the cheese under the salsa so the top layer looked a little more like a graveyard.
Next, I cut a tree and
some tombstone shapes out of the tortilla shells. I cut a few trees and a
variety of tombstone shapes and sizes because I wasn't sure what would
work best. I also cut out a skull because, why not.
The
tortilla tombstones and tree are then baked at 350'C until golden
brown. I just kept setting them for 5 minute timers until they were
done.
Once the tombstones cooled I wrote little names
on them with a sharpee. I didn't have an edible marker and didn't want
to buy one so I just made sure no one ate the tombstones. The tombstones
and tree stood up in the dip easily and even though they will get soggy
it didn't cause them to fall.
I loved how this turned out and it was such a simple and inexpensive way to make a dish I was already going to serve spooky for Halloween! This one is a Pinterest win in my books!
My final product!
_____________________________________________________________________________
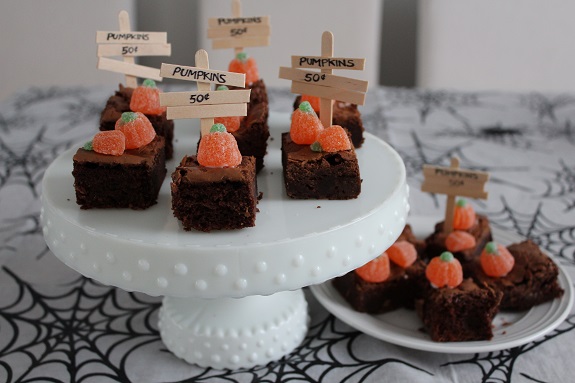
Next up was the Pumpkin Patch Brownies. I was the most excited to try making these because they are so adorable!
The first step is to make brownies or to buy them pre-made.
Next, take your popsicle sticks (I bought "wooden art sticks" from the dollar store and they worked well) and cut them up. You'll want a few longer sticks and then 3 or 4 shorter sticks for each larger stick. The size of your signs will probably depend on how big you are making your brownies.
I tried gluing a sign together before writing on it but I ended up preferring to write on the sticks before gluing. I wrote 'Pumpkins' on one little stick and '50 cents' on another with a sharpie and then glued them together into little wooden signs.
Once the glue on the signs is dry you're ready to make your pumpkin patch! It's just a matter of arranging the brownies how you would like and then adding the signs and pumpkins! I didn't put the oreo crumble on mine because I didn't feel like dealing with the mess haha. This one made me so happy. I honestly don't think I will be able to serve regular brownies ever again. I definitely recommend giving this one a try!
My final product!
_____________________________________________________________________________
These bats just looked so darn cute I had to give them a try.
This one felt more like a craft project than the other ones and would actually be really fun to do with kids. I know peanut allergies are common so if you're child can't handle peanut butter cups, I think these would be just as cute with peppermint patties or any other chocolate treat of a similar size.
First step is to get the peanut butter cups out of their wrappers. Then it was time to break the oreos in half and scrape the icing off. I used decorative icing to attach the oreo wings to the peanut butter cups. If I were to do this again I would use chocolate icing because you could sort of see the white icing.
I didn't buy edible eyes. I just used white decorative icing and silver balls as eyes which worked well.
These were a hit with the kids so I do think this would be a fun activity for them. They were cute but I don't think I would make them again unless I had kids with me!
My Final Product
_____________________________________________________________________________
This Pumpkin Veggie Platter was a last minute decision. I was planning on making a veggie platter and had seen a photo of a pumpkin version on pinterest so I decided I would give it a shot. It was harder than it looked to get the pumpkin shape but once I did the rest was easy. I also had only purchased a few veggies so I had to improvise. I think it turned out cute and didn't cost any extra money so that's a win for me! I don't think everyone noticed it was a pumpkin but I knew, which is all that matters lol.
_____________________________________________________________________________
So those are my Pinterest Halloween Recipes tested! Overall I think they turned out very similar to the photos I found on Pinterest and they weren't very expensive to execute. If you're looking for a cute and easy appy or treat to bring to a Halloween party this weekend I definitely recommend these! Or, if you're like me and enjoy having some delicious food available while handing out candy these are some great options.
Happy Halloween from my little helper and I!


No comments:
Post a Comment
I love reading your comments so thank you for taking the time to leave them! If you have a question for me please make sure to leave an email address I can reach you at. Also, if you have a blog leave the url so I can stop by!